15 Easy Kwanzaa Crafts for Kids Ages 2 to 6

Kwanzaa 2026 runs from Saturday, December 26, through Friday, January 1, 2027, and one of its seven principles, Kuumba, means creativity. Nearly every symbol on a Kwanzaa table, like the candleholder and the corn, can be made by a 3-year-old with paper and glue. That's why Kwanzaa crafts work so well with little kids.
Key Takeaways
- Most of these crafts take 5 to 25 minutes and use paper, paint, cardboard tubes, and glue.
- Toddlers do best with tearing, stamping, and sticking, while kids 4 and up can weave and cut.
- Talk about the symbol while you work, because that's how the Swahili names start to stick.
- Keep real candles away from paper crafts and use battery tea lights instead.
Before You Start: Colors and Supplies
Nearly every Kwanzaa craft sticks to black, red, and green. They're the candle colors on the kinara and the stripes on the Kwanzaa flag. One sentence per color is plenty for a preschooler:
- Black stands for people of African descent. To a 3-year-old you can say, this one is for the people.
- Red stands for their struggles. Try, this one is for the hard things they got through.
- Green stands for hope and the future. Try, this one is for all the good things coming.
A basic kit covers almost all 15 crafts:
- Construction paper in black, red, green, and yellow
- Washable paint and a few brushes
- Glue sticks, white glue, and clear tape
- Kid scissors (for ages 3 and up)
- Paper plates, paper cups, and paper bowls
- Cardboard tubes from toilet paper and paper towels
- Yarn, tissue paper, and a few craft sticks
You'll use the same Kwanzaa craft kit for arts and crafts for kids the rest of the year. Pour the paint into three small cups, one color each, before your kid sits down, or it'll be one brown puddle within minutes.

Help your child
grow with Keiki
We’ll help you turn everyday screen time
into real learning progress.
Kwanzaa Crafts for Toddlers (Ages 2 to 3)
With toddlers, let them do the tearing, stamping, squishing and sticking, and you do any cutting. Five to 10 minutes of focus is a good day at this age. We left out beads, dried pasta and anything else small and loose, since those are choking hazards for kids under 3.
1. Fingerprint Kinara
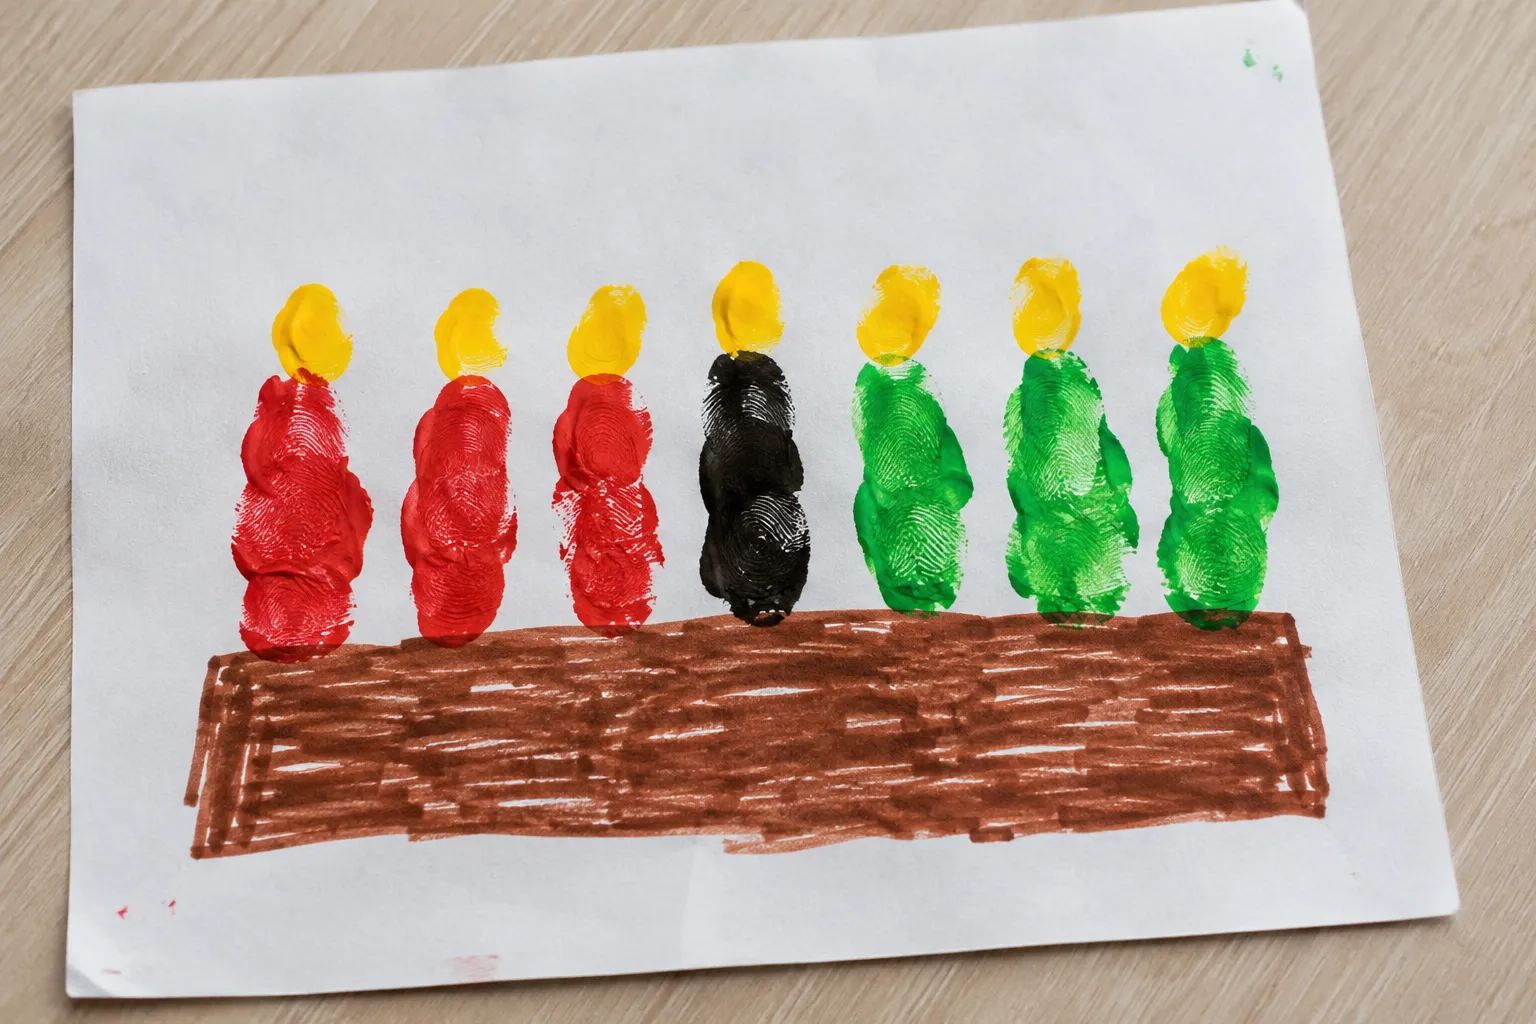
A fingerprint kinara is a painting of the Kwanzaa candleholder, with your toddler's fingers making all seven candles. It's messy in a good way and takes about 10 minutes.
You need: white paper, a brown marker, washable paint in red, black, green, and yellow, and paper plates for the paint.
- Draw a wide brown rectangle across the bottom third of the page. That's the holder.
- Make seven small pencil dots along the top edge of the rectangle, spaced about a finger apart. They show your toddler where each candle goes.
- Your toddler dips a finger in black paint and drags a short line up from the middle dot.
- Wipe the finger, then do three red lines on the left dots and three green lines on the right dots. You'll probably need to guide that hand a bit.
- Finish with a yellow fingertip dot on top of each line for the flames. Let it dry flat for about an hour.
Count the candles out loud while it dries. One black, three red, three green, seven altogether, which matches the seven days of Kwanzaa.
2. Torn-Paper Mkeka
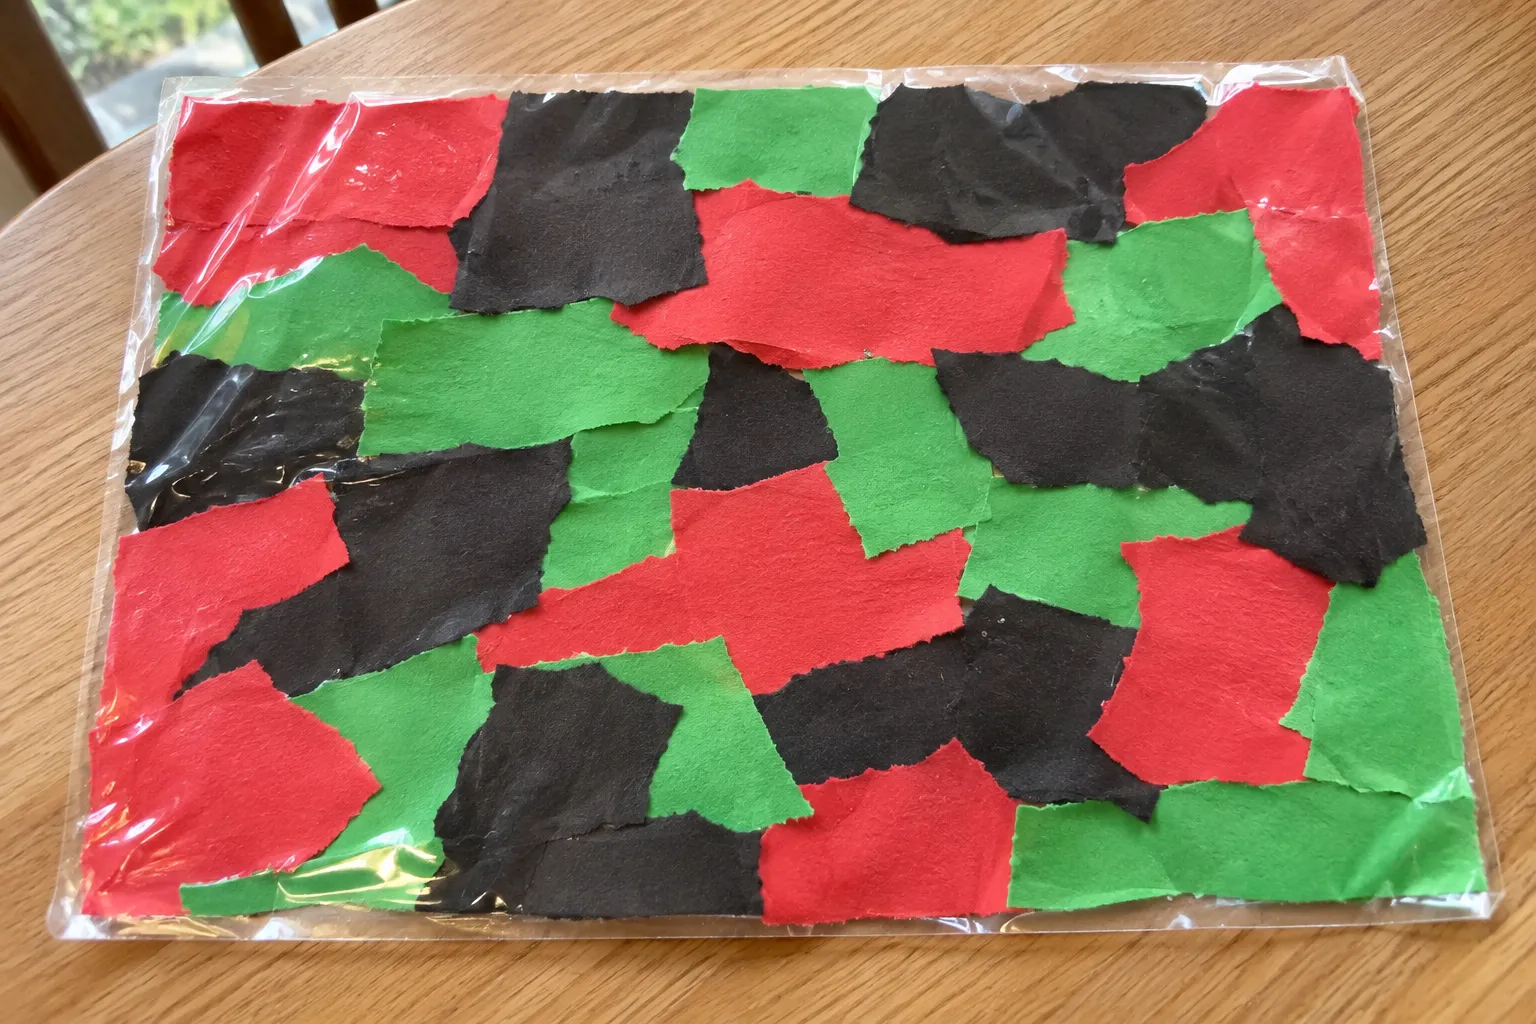
A torn-paper mkeka is a toddler version of the woven Kwanzaa mat that all the other symbols sit on. Your kid just rips paper and sticks it down, with no weaving and no glue.
You need: clear contact paper, painter's tape, and red, black, and green construction paper cut into strips about 1 inch wide.
- Cut two pieces of contact paper about the size of a regular sheet of paper.
- Peel the backing off one piece and tape it to the table, sticky side up, with painter's tape on all four corners.
- Hand your toddler the paper strips. They rip them into pieces and press the pieces onto the sticky side.
- When most of the sticky side is covered, lay the second sheet of contact paper on top, sticky side down, and smooth it out with your hand.
- Trim the edges with scissors so it looks like a little mat.
Your toddler's mkeka can sit under a cup or a toy kinara all week.
3. Corn Print Painting
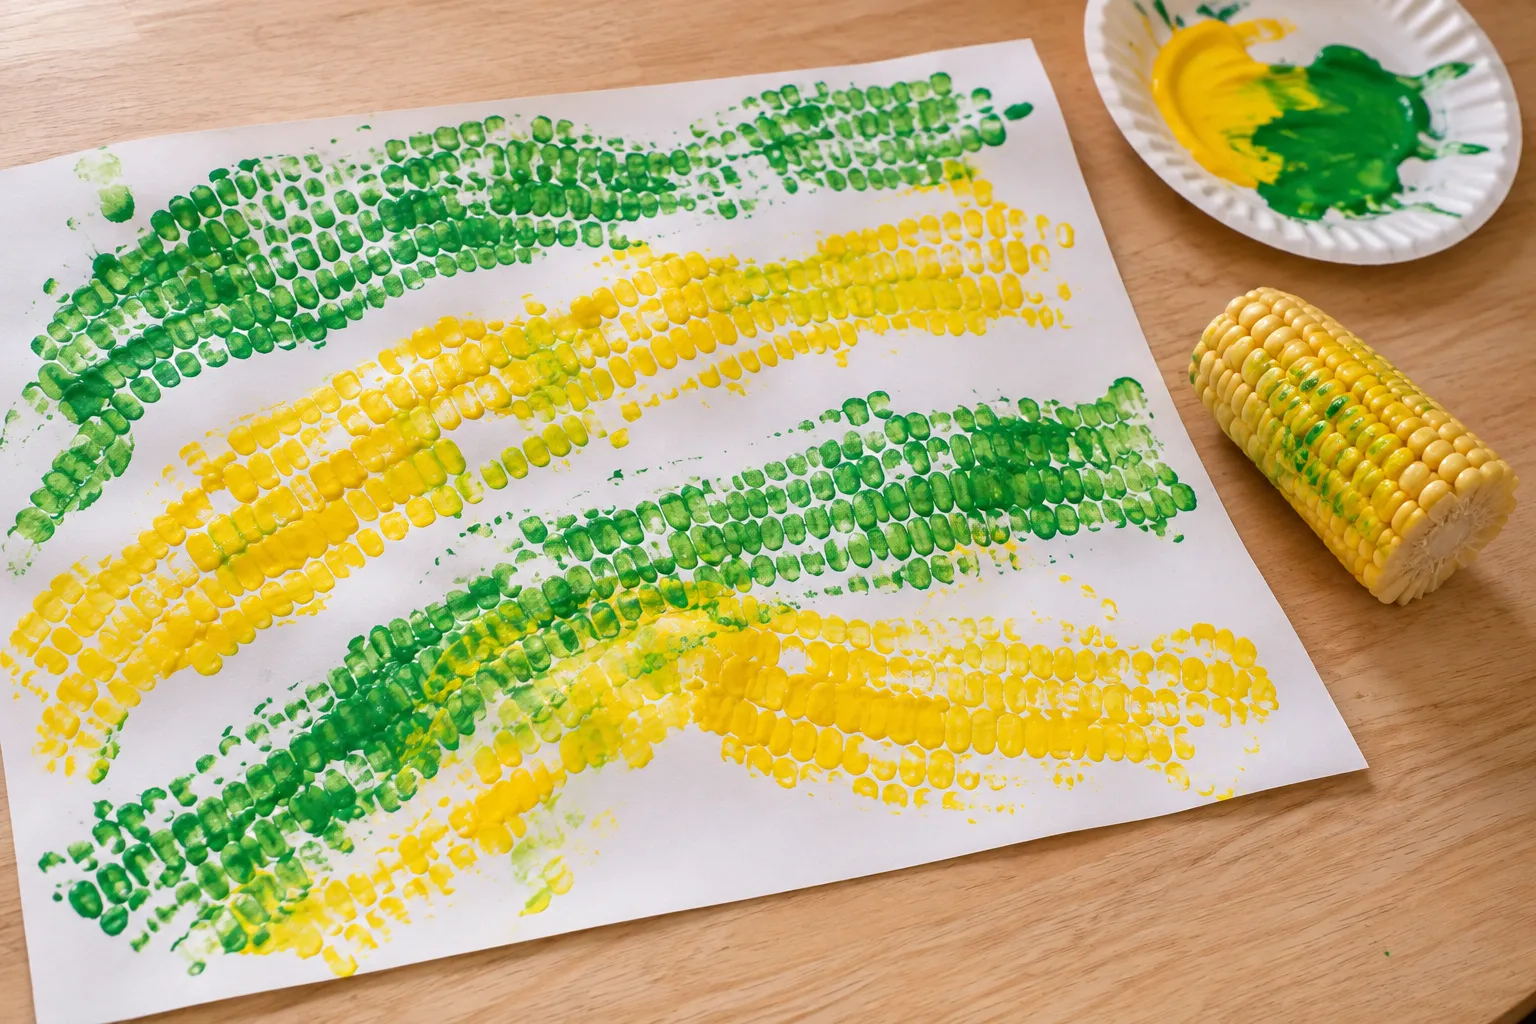
Corn print painting means rolling a real ear of corn through paint to make bumpy stripes. It's a nod to muhindi, the ears of corn on a Kwanzaa table, one for each child in the family.
You need: one fresh, raw ear of corn with the husk and silk pulled off, washable yellow and green paint, a baking sheet or paper plate, and a large sheet of paper.
- Cut the ear of corn in half across the middle so each piece is short enough for a small hand. An adult does this part.
- Squeeze a puddle of paint onto the baking sheet and spread it thin with a brush.
- Your toddler holds the corn at both ends and rolls it through the paint until it's coated.
- Then they roll it across the paper, pressing down a little. One roll makes one stripe of kernel bumps.
- Check the cob for loose kernels before and after, and throw away any that pop off.
Make one corn stripe per kid in the family and say each name out loud as you roll.
4. Red, Black, and Green Squish Bag
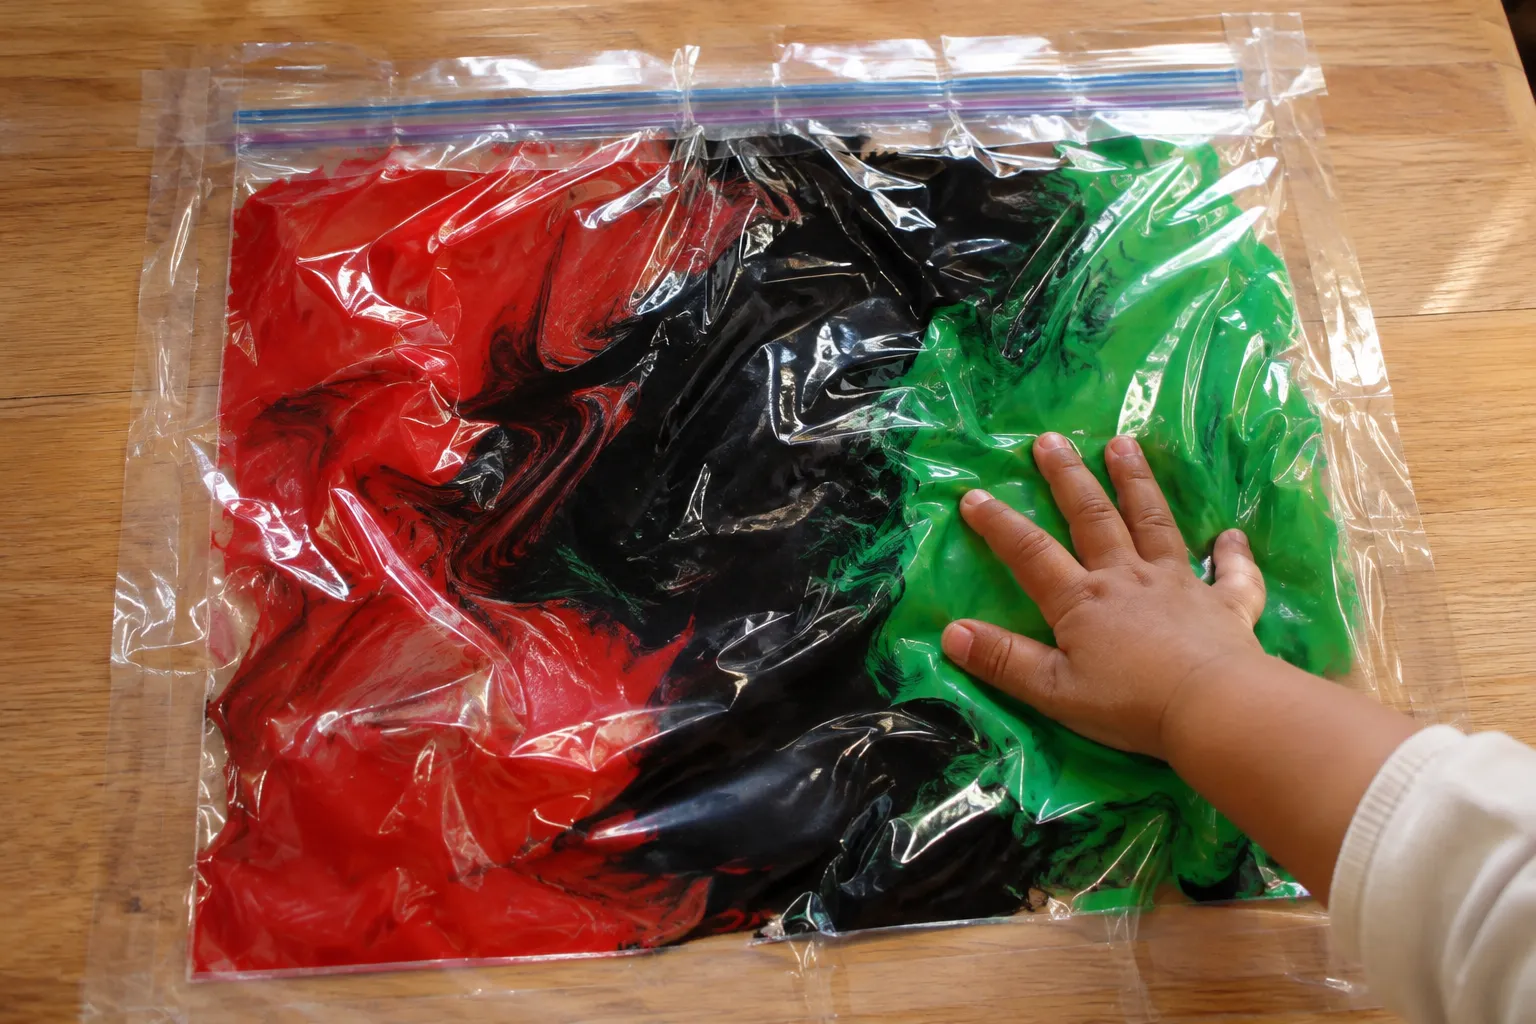
A squish bag is a sealed zip-top bag of red, black, and green paint your toddler can mush around without getting messy. It's great for the youngest kids, or any kid who hates sticky fingers.
You need: a gallon-size freezer zip-top bag, about 2 tablespoons each of red, black, and green washable paint, and wide packing tape.
- Spoon each paint color into a different corner of the bag.
- Lay the bag flat, push all the air out toward the opening, and seal it.
- Run a strip of packing tape over the zipper so it can't be opened.
- Tape the bag flat to the table or a sunny window, with tape along all four edges.
- Your toddler pushes and squishes the paint through the plastic and watches the colors slide around. Stay close, and toss the bag if it starts to leak.
While your toddler squishes, name each Kwanzaa color as it moves and point to the same colors on a kinara picture. If your little one wants more color practice afterward, Keiki World's color games start at age 2.
Turn Kwanzaa Coloring Pages Into Crafts
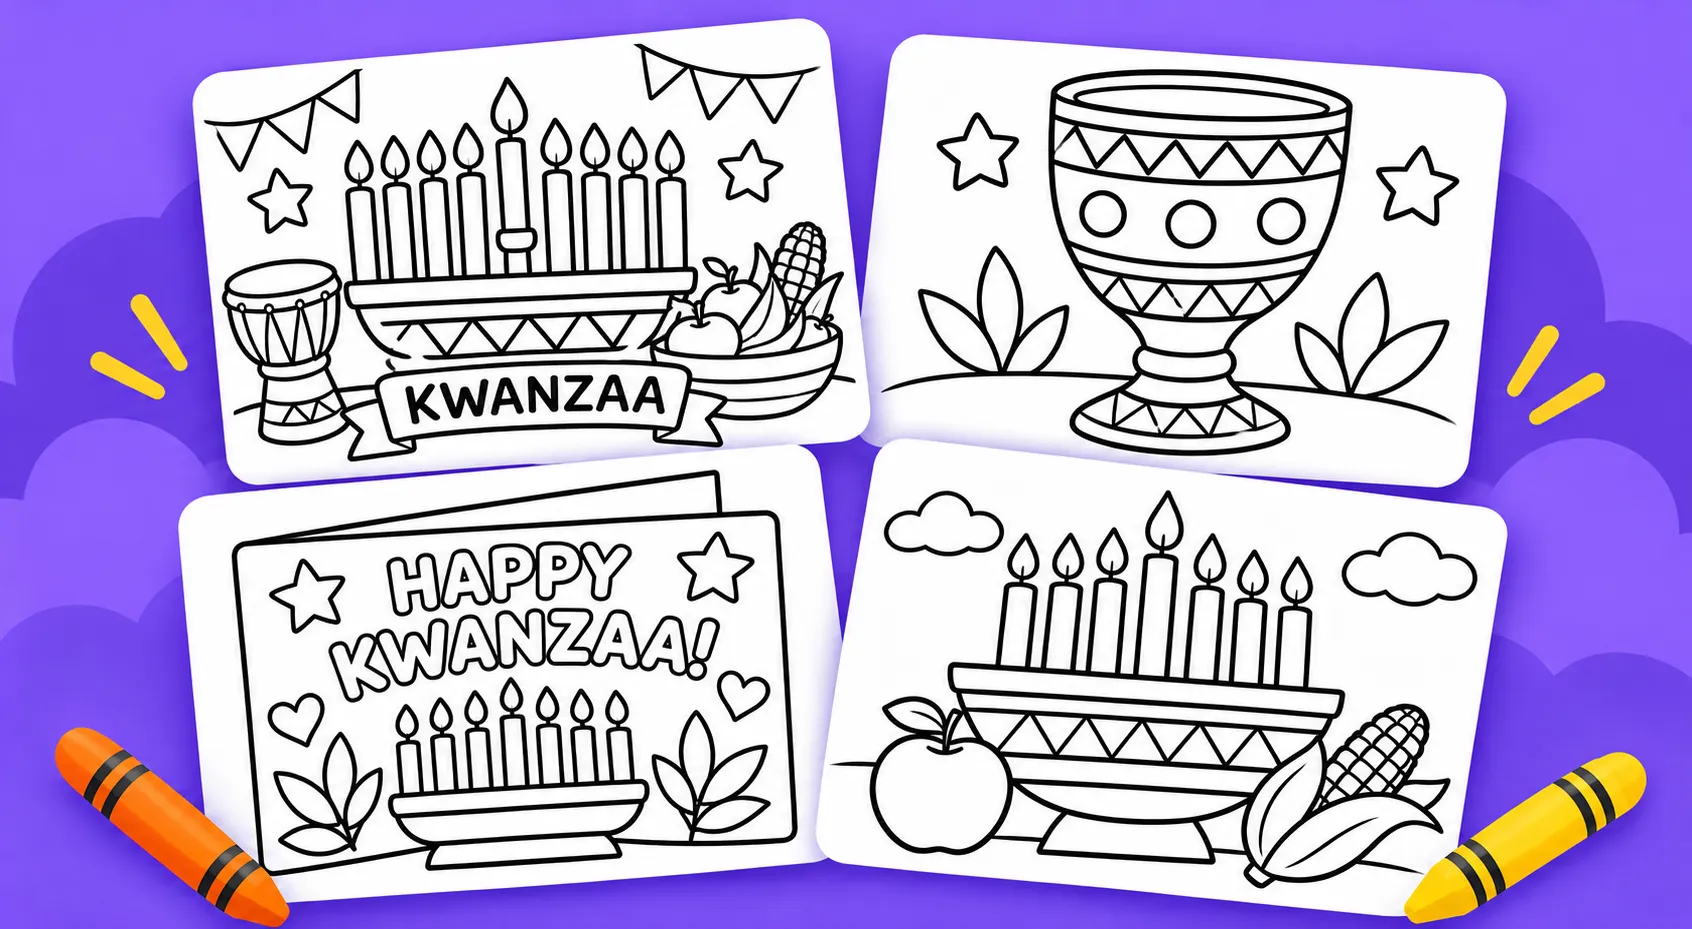
On nights you don't want to get the paint out, a printed coloring page is a quick starting point for a craft. Keiki World has Kwanzaa coloring pages on its website.
Ways to turn a printed page into one of the Kwanzaa crafts above:
- Color a page with a Kwanzaa symbol, cut it out, and glue it in the middle of the woven paper mkeka. You now have a centerpiece for the Karamu table.
- Color three or four pages, punch two holes at the top of each, and add them to the Kuumba banner between the paper triangles.
- Cut a colored page in half and glue it to the front of a zawadi card.
- Give a toddler a page to color while an older sibling works on a bigger project, so everyone makes something at the same table.
While your kid colors a Kwanzaa page, ask which candle gets lit first or what the corn stands for.
Kwanzaa Preschool Crafts (Ages 3 to 5)
Somewhere around 3 or 4, kids can cut a little, glue things where they're meant to go, and copy a short pattern. Each of these six takes roughly 15 to 25 minutes, plus drying time.
5. Woven Paper Mkeka
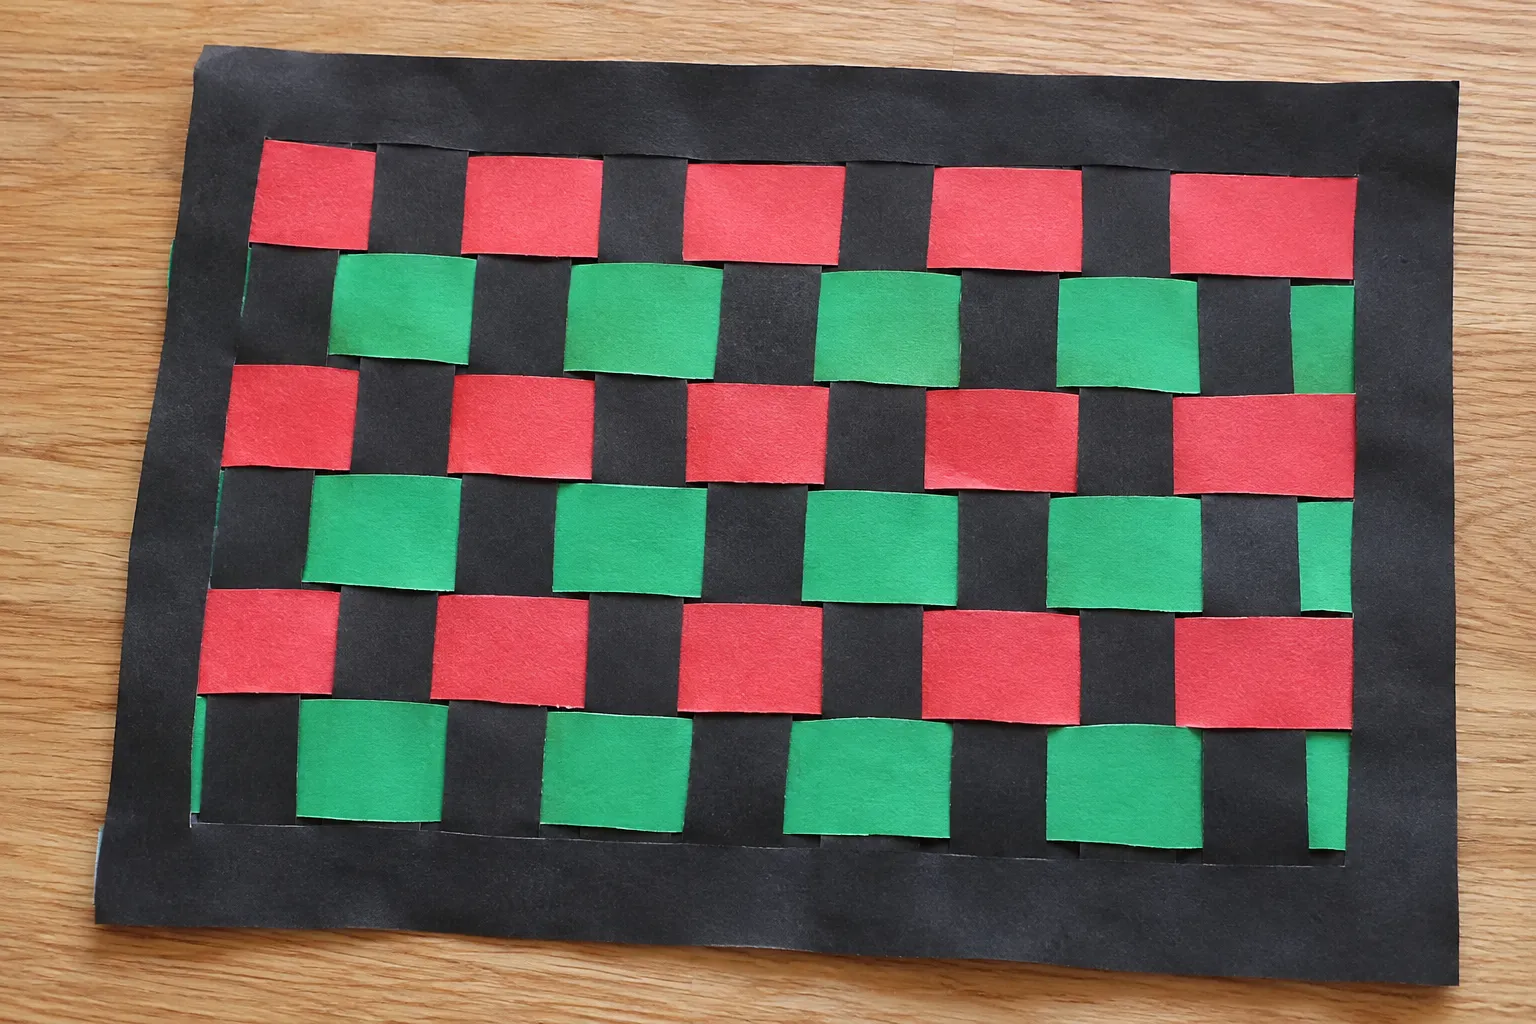
A woven paper mkeka is the classic Kwanzaa mat, made by weaving red and green strips through a black paper frame. It takes a few tries, so don't worry if the first row is crooked.
You need: one sheet of black construction paper, red and green construction paper, scissors, a ruler, and a glue stick.
- Fold the black sheet in half the long way.
- Starting at the fold, cut straight slits about 1 inch apart. Stop each slit about 1 inch before the open edge so the frame stays in one piece. An adult can do this step for 3-year-olds.
- Unfold the sheet.
- Cut the red and green paper into strips about 1 inch wide and as long as the black sheet is wide.
- Your child weaves the first strip over one slit, under the next, over, under, all the way across.
- Start the second strip the opposite way, under first, then over. Keep switching until the frame is full.
- Push the strips close together, then put a dab of glue under each strip end to hold it in place.
Four-year-olds can try a color pattern, like red, green, red, green. This is a good kwanzaa craft for preschoolers who are just learning scissors, because the weaving gives their hands a break between cuts.
6. Cardboard Tube Kinara
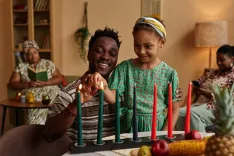
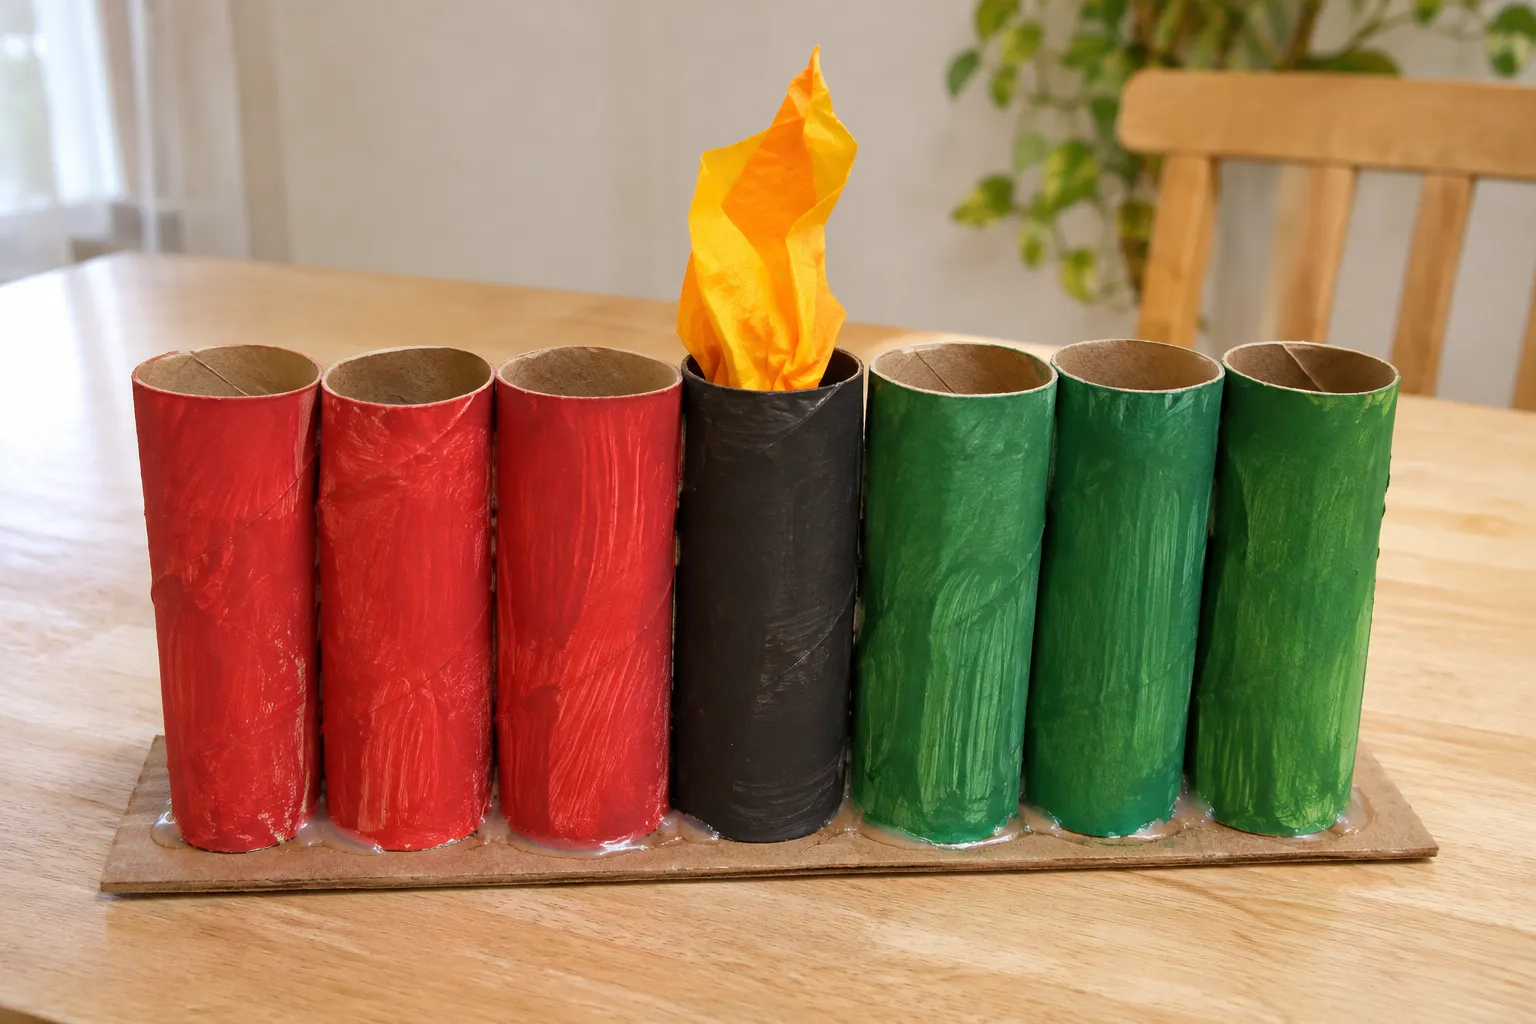
A cardboard tube kinara is a stand-up candleholder made from seven painted toilet paper tubes, with tissue paper flames your kid can light one night at a time.
You need: seven toilet paper tubes (start saving them a week or two ahead), red, black, and green paint, a strip of cardboard about 12 inches long cut from a cereal box, white glue, and yellow or orange tissue paper.
- Your child paints one tube black, three red, and three green. Let them dry for about an hour.
- Glue the tubes standing up in a row on the cardboard strip. Put black in the middle, the three red tubes on the left, and the three green tubes on the right.
- Let the glue dry overnight so the tubes don't tip over.
- Cut seven squares of tissue paper, about 4 inches each, and twist each one at the middle to make a flame.
- Push one flame down inside each tube until it's hidden.
Each night of Kwanzaa, your child pulls up one more tissue flame on the tube kinara. The black candle gets lit first on December 26, so start there.
7. Unity Cup
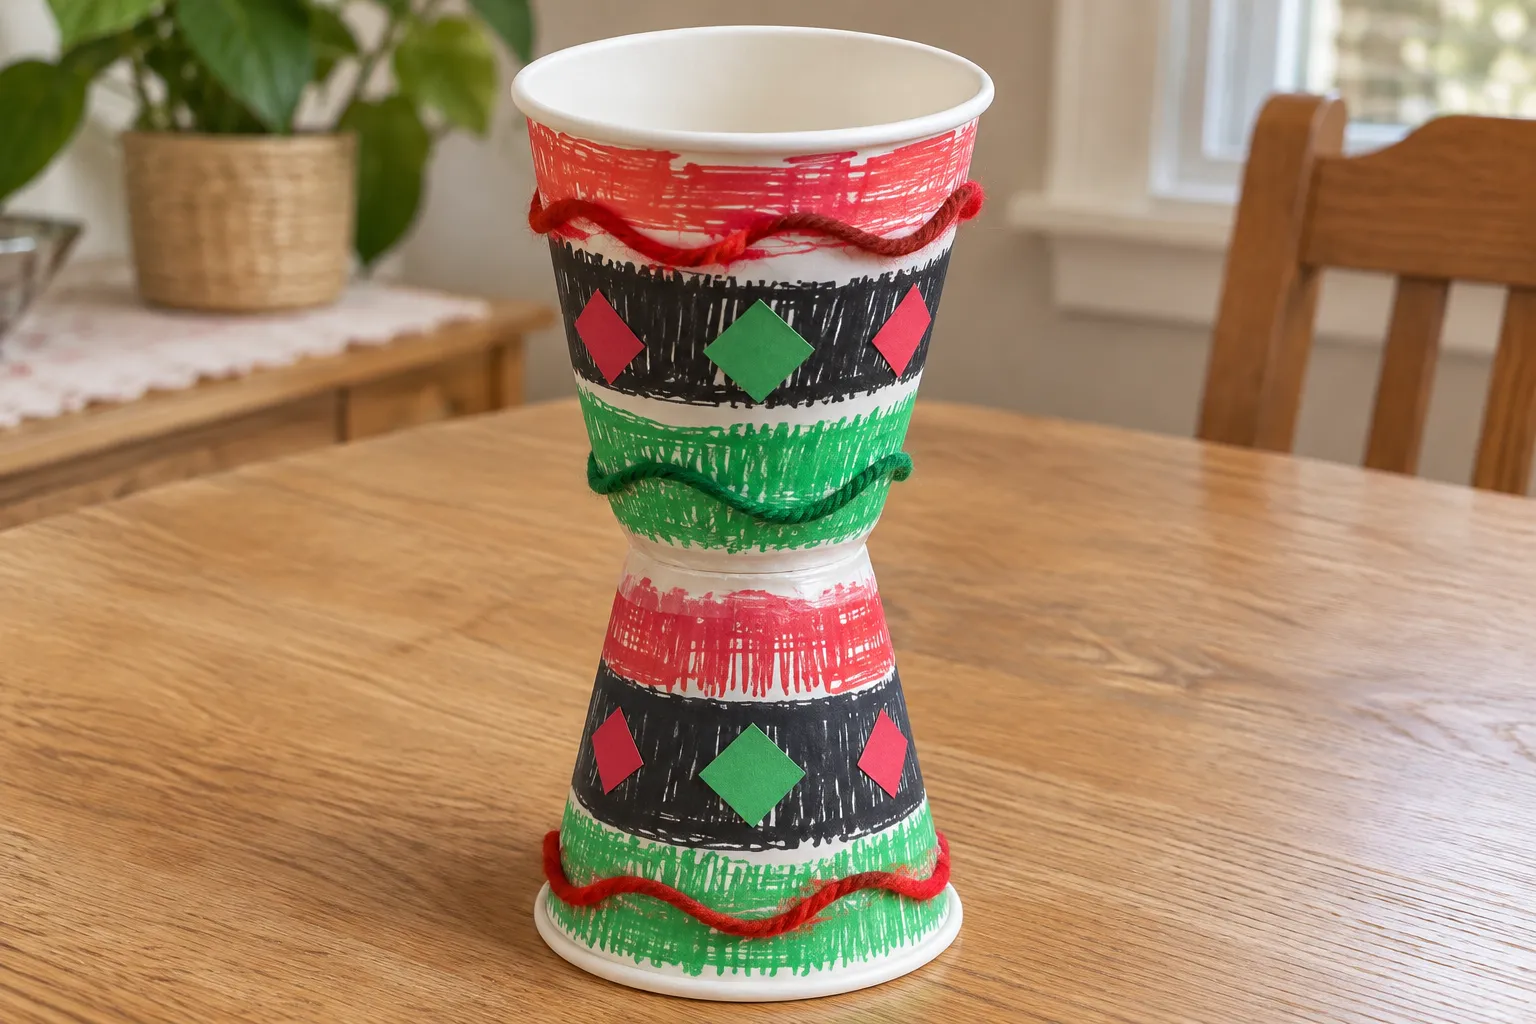
A paper unity cup is a decorated copy of the kikombe cha umoja, the cup families pour from to honor the people who came before them. The paper one is just for show, so don't pour anything into it.
You need: two paper cups, white glue or clear tape, and stickers, markers, or bits of yarn in red, black, and green.
- Turn one cup upside down. That's the stand.
- Glue the bottom of the second cup on top of it, right side up, so the two bottoms touch and it looks like a goblet. A ring of tape around the joint makes it sturdier.
- Let the glue dry for about 30 minutes.
- Your kid decorates the whole thing with stickers, markers, or yarn in the three Kwanzaa colors.
While the unity cup dries, ask your kid which grandparent or great-aunt they'd want to remember.
8. Three-Color Pasta Necklace
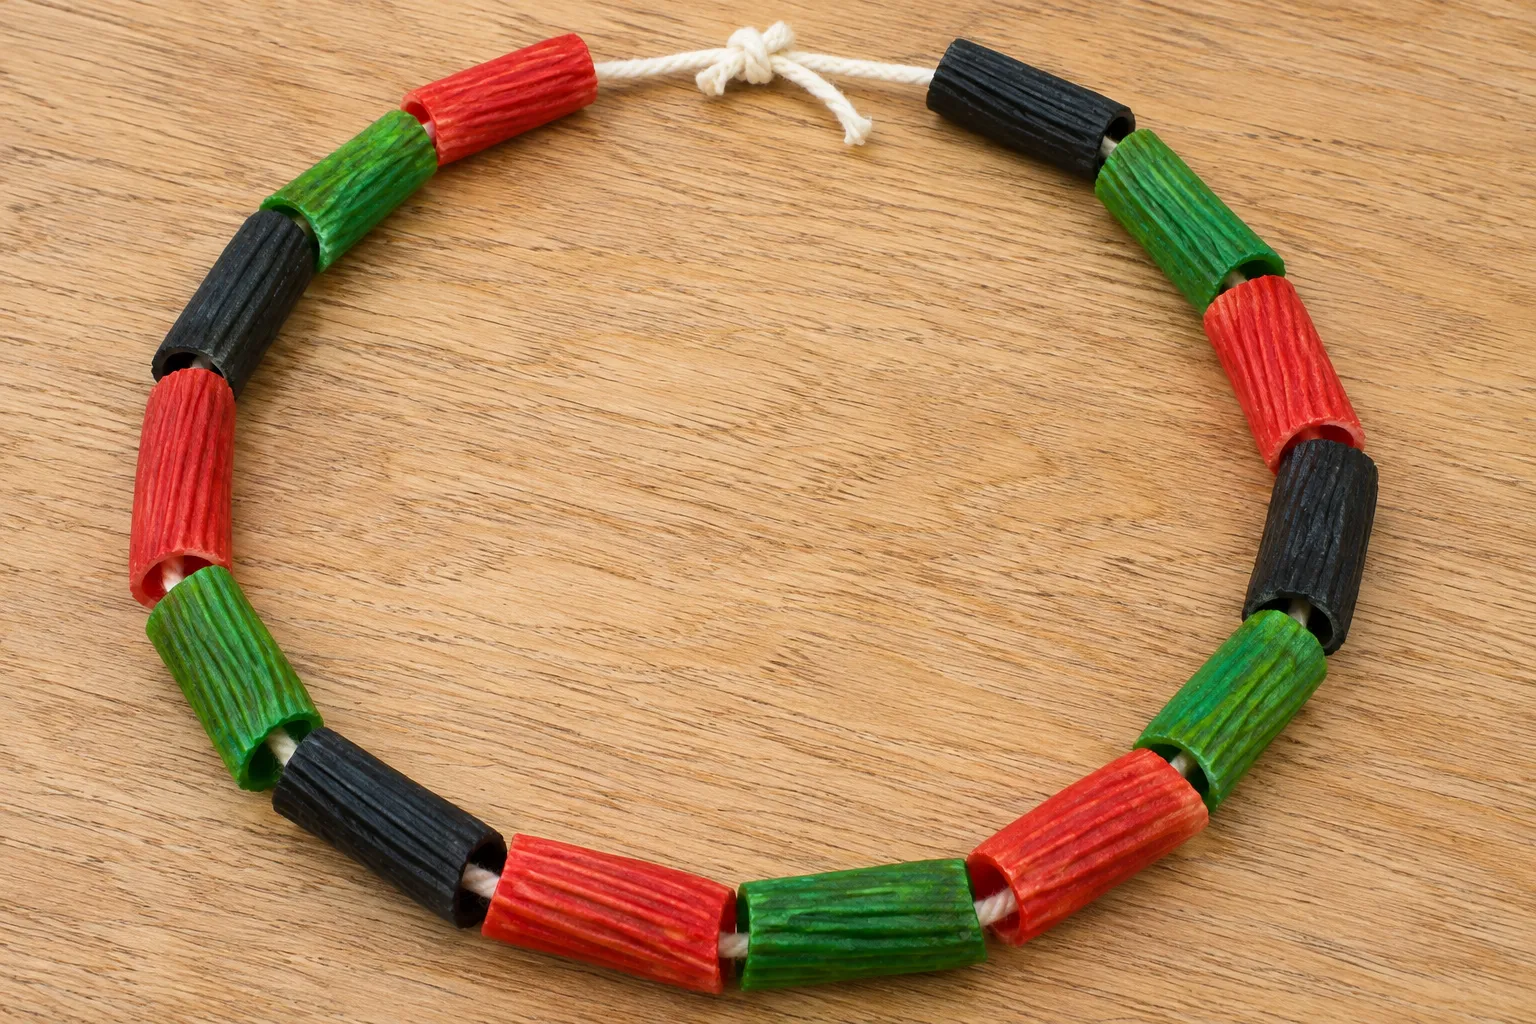
A pasta necklace is dyed tube pasta strung on yarn in the three Kwanzaa colors. Start it the day before, since the dyed pasta has to dry overnight.
You need: a cup of dried tube pasta like penne or rigatoni, three zip-top bags, red and green food coloring, black gel food coloring or black washable paint, white vinegar, paper towels, yarn, and clear tape.
- Split the pasta between the three bags.
- Add about 10 drops of food coloring and a teaspoon of vinegar to each bag, one red, one green, one black. For black, gel coloring works best. If you can't find it, paint that pasta black instead.
- Seal the bags and let your kid shake them until the pasta is evenly colored.
- Spread the pasta on paper towels and let it dry overnight.
- Cut a piece of yarn about 24 inches long, long enough to slip easily over your child's head. Wrap one end tightly in tape to make a needle.
- Tie one piece of pasta to the other end of the yarn so the rest don't slide off.
- Your kid strings the pasta on. When they're done, tie the two ends together in a double knot.
While stringing, ask your kid for a color pattern, like red, black, green, red, black, green. Save the pasta necklace for kids who no longer put things in their mouths, and take the necklace off before naps, bedtime, and climbing play.
9. Kwanzaa Flag
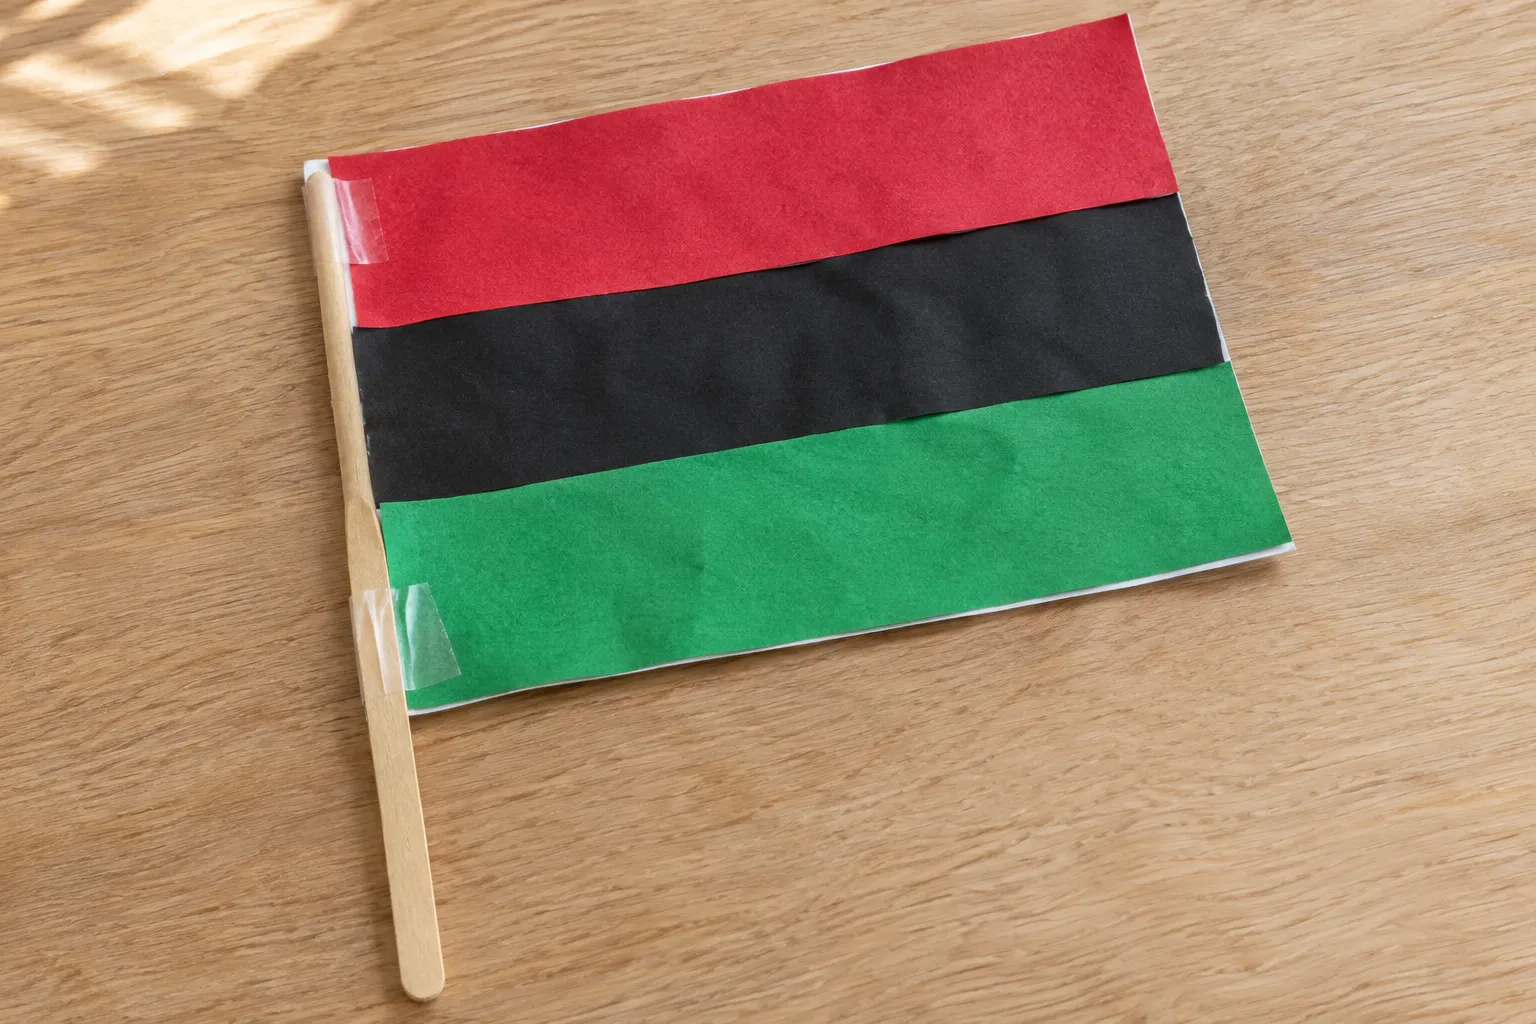
A paper Kwanzaa flag is your kid's own bendera, the red, black, and green flag many families hang during Kwanzaa. Its three stripes go across, with red on top, black in the middle, and green on the bottom.
You need: one sheet of white paper, red, black, and green construction paper, a glue stick, and a straw or craft stick with clear tape.
- Cut the white sheet in half. One half is the flag.
- Cut one strip each of red, black, and green paper, each about a third as tall as the flag and just as wide.
- Your child glues the red strip along the top edge, the black strip in the middle, and the green strip along the bottom.
- Lay the straw or craft stick along the left edge and tape it on in two or three places.
Make a paper flag for everyone and wave them at the Karamu, the Kwanzaa feast on December 31.
10. Seven Principles Paper Chain
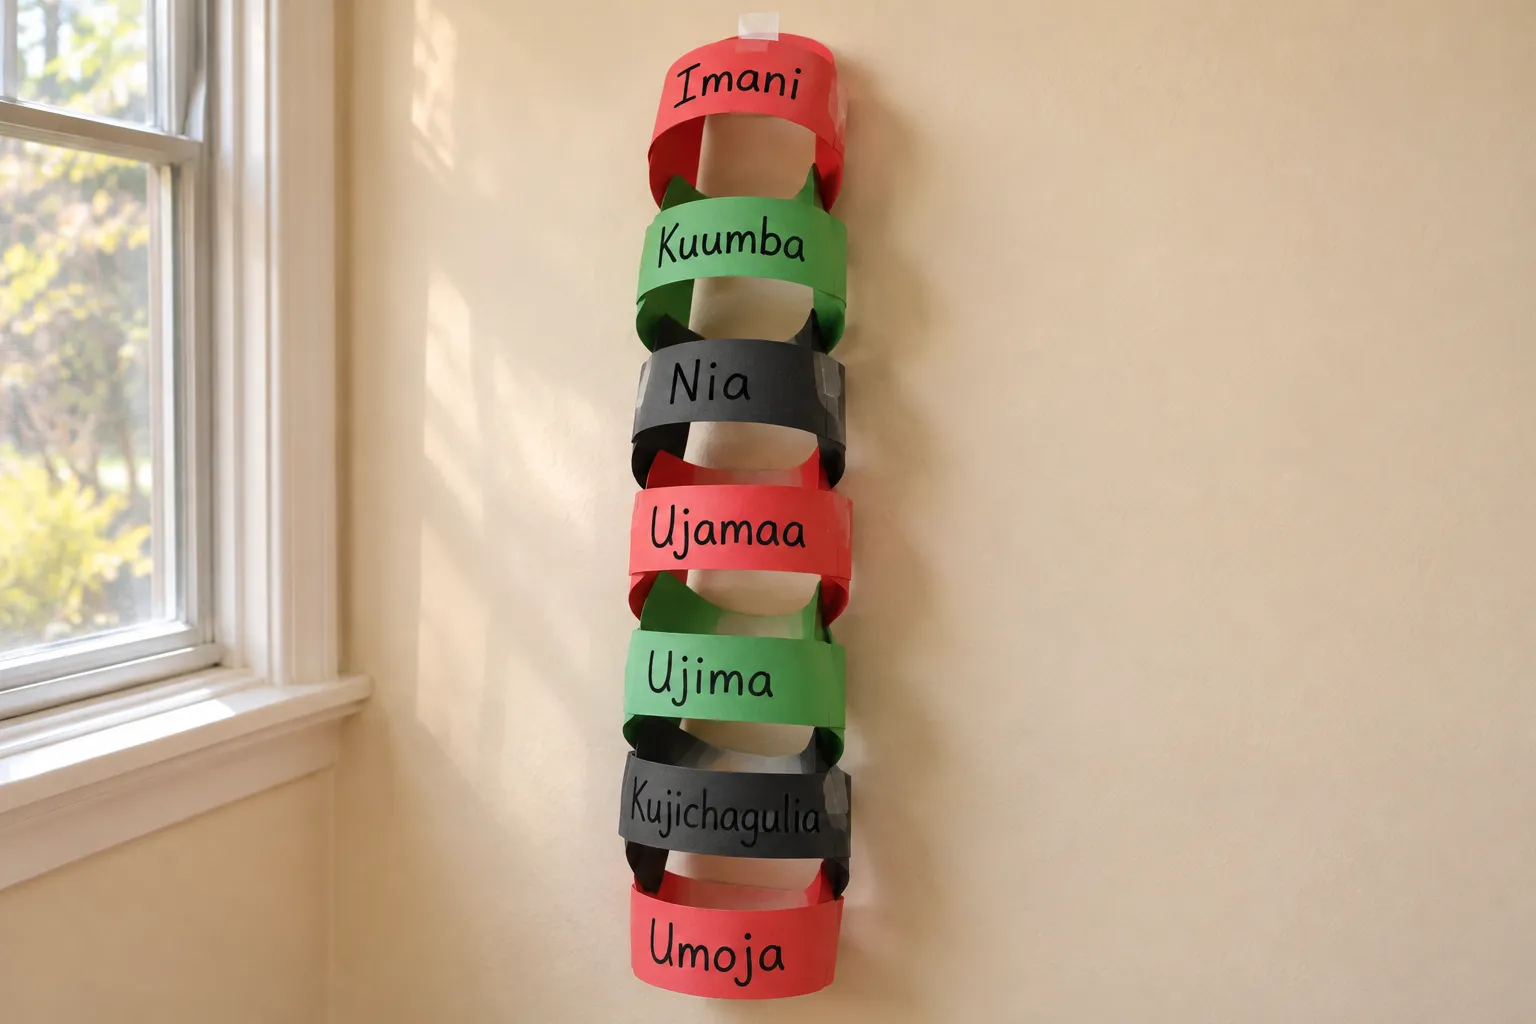
This paper chain counts down the seven days of Kwanzaa, one principle at a time. Make it before Kwanzaa starts on December 26.
You need: red, black, and green construction paper, a marker, scissors, and a glue stick or tape.
- Cut seven paper strips, each about 1 inch wide and 8 inches long, using all three colors.
- Write one principle on each strip: Umoja, Kujichagulia, Ujima, Ujamaa, Nia, Kuumba, and Imani.
- Your child bends the Imani strip into a loop and glues or tapes the ends together.
- Then they thread the next strip, Kuumba, through that loop and close it. Keep going in reverse order until Umoja is the last link at the bottom.
- Hang the chain from the top link.
Each night of Kwanzaa, tear off the bottom link of the paper chain, read the principle out loud, and talk about what it means.
Kwanzaa Projects for Preschoolers Ages 5 to 6
By 5 or 6 most kids can stick with a project over two sittings, or make something for the whole family. These ones need more cutting, a bit of writing, and some thinking ahead. They also go over well as group projects in a pre-K or kindergarten room.
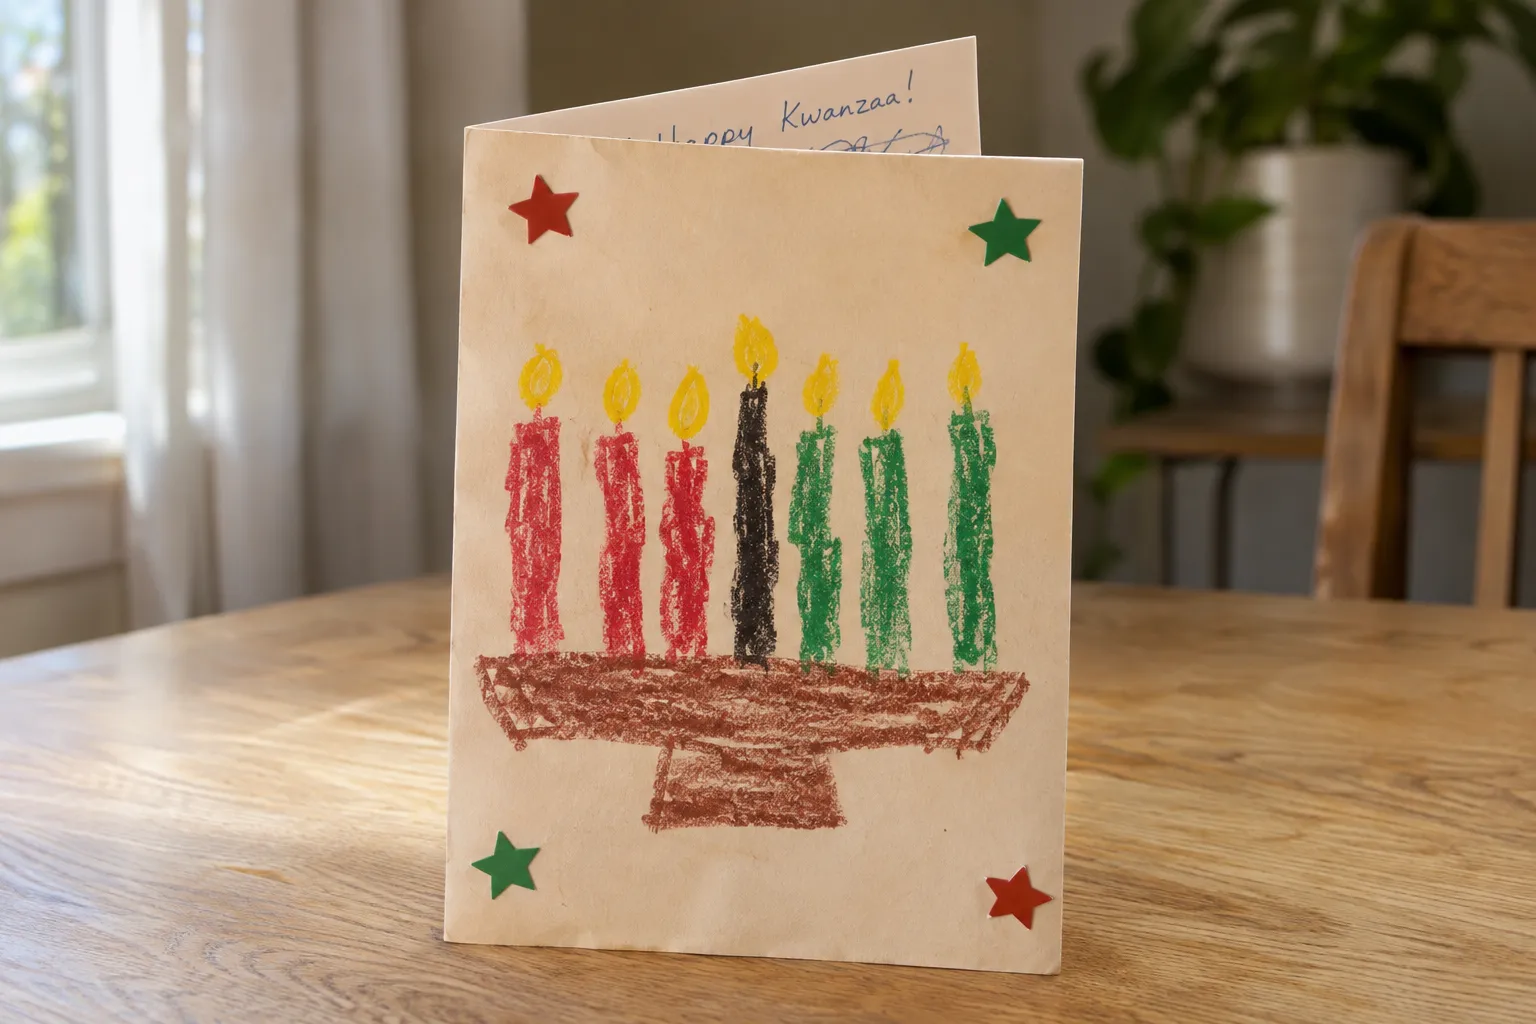
11. Zawadi Card
A zawadi card is a handmade card your child gives as a Kwanzaa gift. Zawadi are the gifts children get on January 1, the last day of Kwanzaa, and they're often handmade.
You need: a sheet of construction paper, crayons or markers, and stickers if you have them.
- Fold the paper in half like a book.
- They draw a picture on the front. A kinara, the person they're giving it to, or the two of them together all work.
- Inside, they write a short message, or tell you the words and you write them down. Let them sign their own name.
Ask your kid who the zawadi card is for and why. A note to a grandparent or a teacher fits Imani, the principle of faith, which is about believing in the people around you.
12. Karamu Napkin Rings
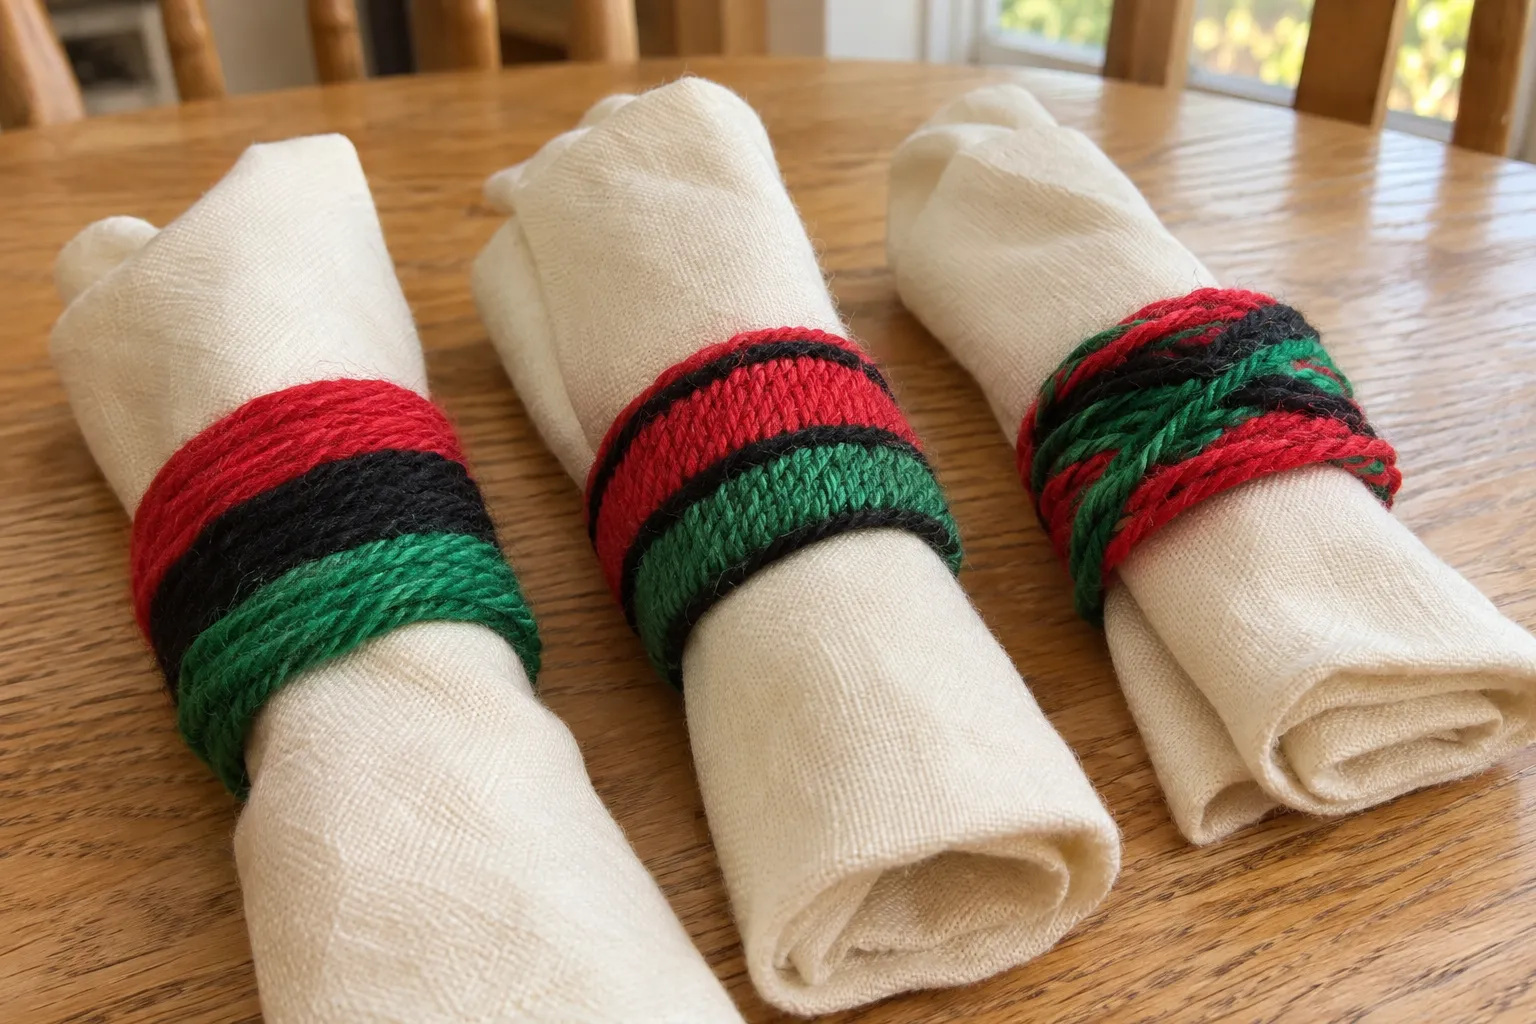
Karamu napkin rings are cardboard rings wrapped in Kwanzaa-colored yarn for the feast table on December 31.
You need: one paper towel tube for every four or five guests, scissors, red, black, and green yarn, clear tape, and stickers or paint.
- Flatten the tube a little and cut it into rings about 1 inch wide. An adult does the cutting, because cardboard tubes are tough on small scissors.
- Your child tapes one end of the yarn to the inside of a ring.
- They wrap the yarn around and around the ring until the cardboard is covered.
- Cut the yarn and tape the end inside the ring. If wrapping is too fiddly, paint the rings instead and add stickers once they're dry.
- Roll up a napkin and slide it through each ring.
Making a napkin ring for every guest is a real job that helps the whole family get ready, which fits Ujima, the principle of working together. In a classroom, each child makes one and they all go into a basket for the class party.
13. Paper Harvest Basket
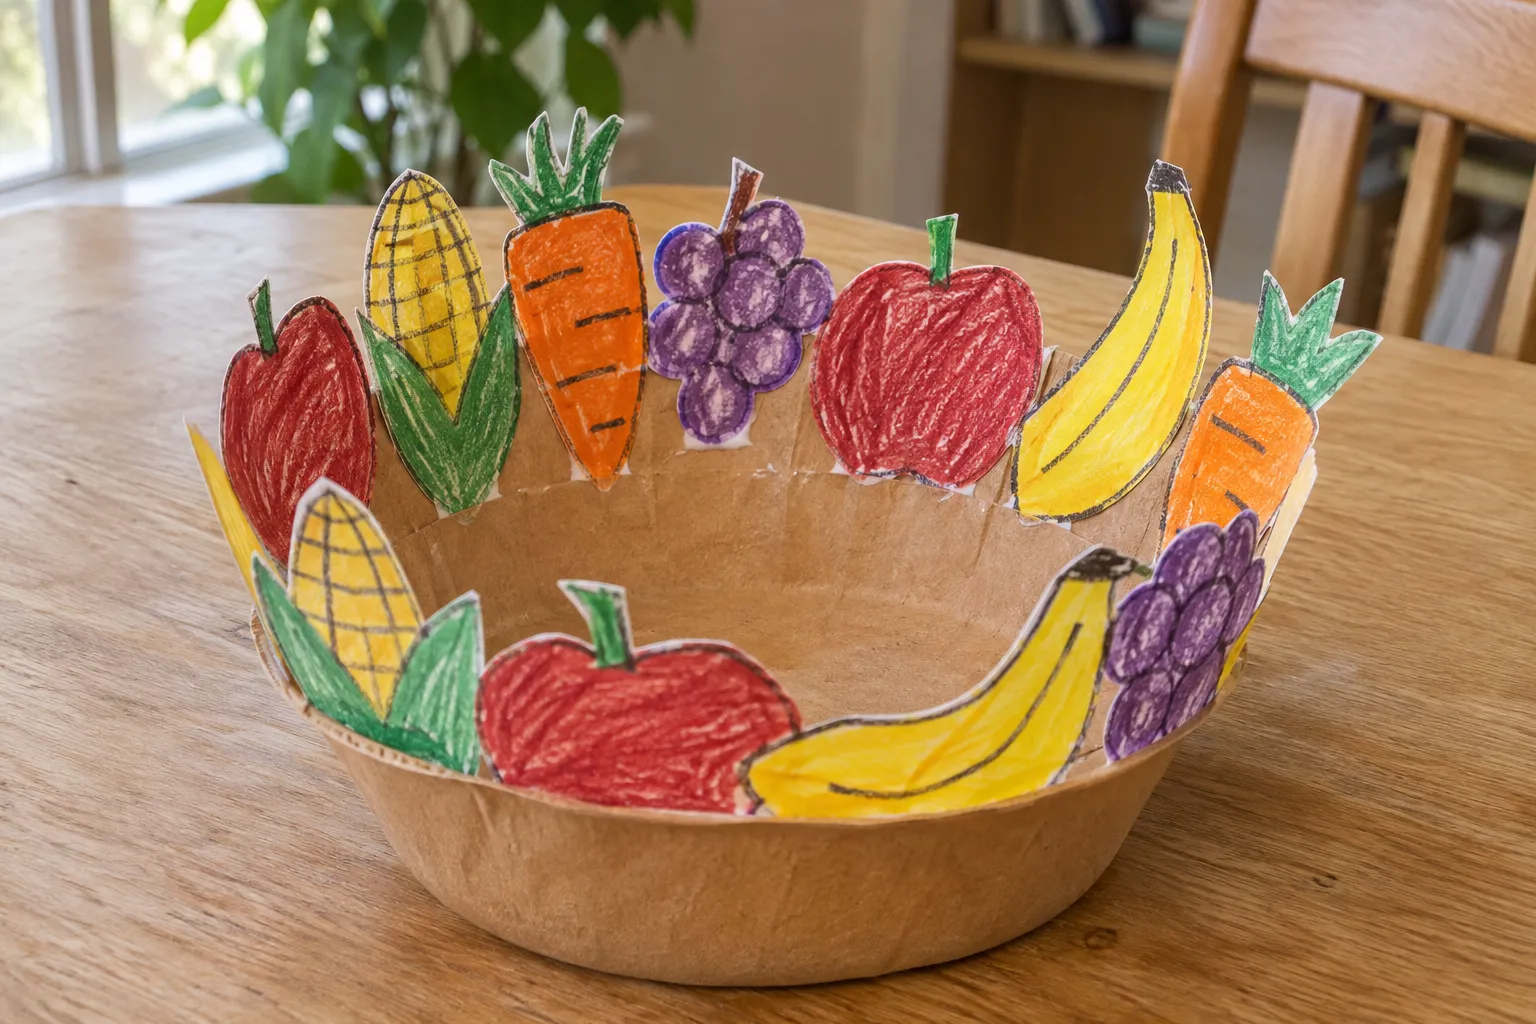
A paper harvest basket is a paper bowl piled high with paper fruits and vegetables. It stands for the mazao, the harvest foods families put on the Kwanzaa table.
You need: a paper bowl, construction paper in several colors, markers, scissors, and a glue stick.
- Your child draws fruits and vegetables on the colored paper, each about the size of their palm. Apples, bananas, carrots, and corn are easy shapes.
- They cut each one out.
- Glue the back of each piece and press it to the inside rim of the bowl so it sticks up over the edge.
- Keep adding pieces around the rim until the basket looks full.
Once the harvest basket is done, older kids can set up a play market with their paper fruit and take turns buying and selling. That's a good way into Ujamaa, the principle about supporting each other's businesses.
14. Paper Corn Family
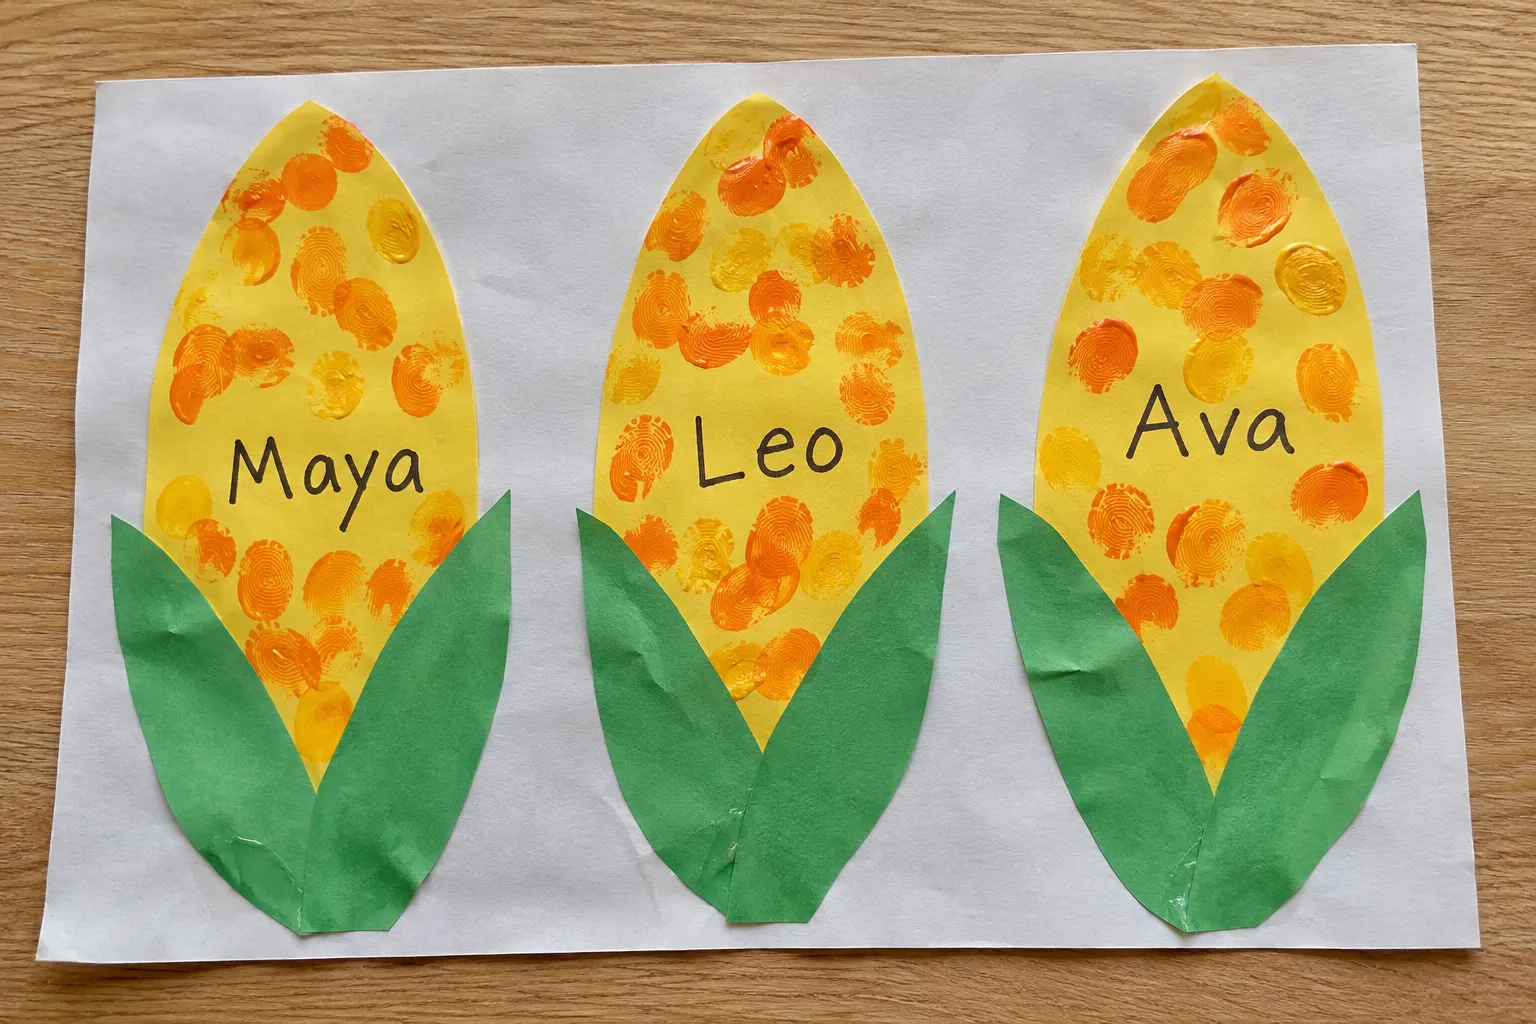
A paper corn family is one paper ear of corn for each child in your family, all glued on one page. Muhindi, the Kwanzaa corn, stands for children and the future.
You need: yellow and green construction paper, yellow or orange washable paint, a marker, scissors, a glue stick, and one large sheet of paper.
- Draw a long oval with a slightly pointed top on the yellow paper, about the length of your child's hand. Make one for each child in your family.
- Your child cuts the shapes out.
- They fill each ear with fingerprint dots of paint for kernels, then let it dry for about 30 minutes.
- Write one child's name across the middle of each ear.
- Cut two long leaf shapes from green paper for each ear and glue them at the bottom as husks.
- Glue all the ears side by side on the large sheet.
Hang the paper corn family on December 30, the day of Nia, or purpose, and ask your child what they want to do when they grow up to help other people.
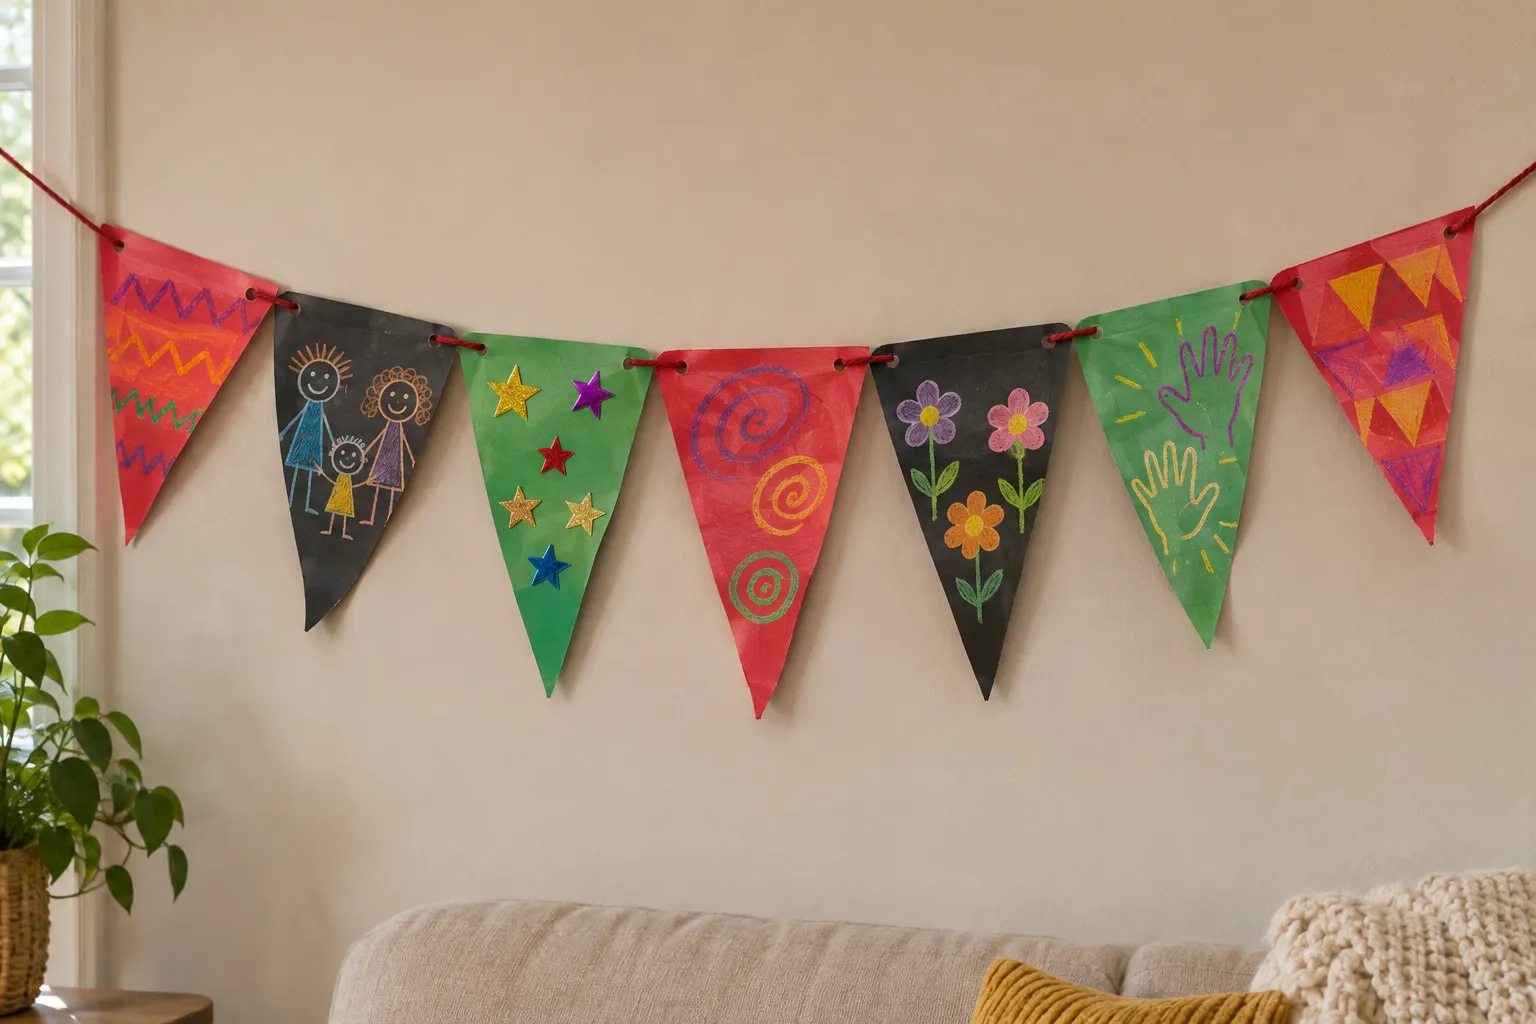
15. Kuumba Banner
A Kuumba banner is a string of paper triangles that each person decorates their own way. Kuumba means creativity, so no two pieces should match.
You need: red, black, and green construction paper, a ruler, scissors, markers and stickers, a hole punch, and a long piece of yarn.
- Cut triangles about 8 inches across the top and 10 inches tall, at least one for each person.
- Each person decorates one triangle with drawings, stickers, the Swahili names, or patterns.
- Punch a hole in each top corner of every triangle. An adult usually needs to do this, because hole punches are stiff for small hands.
- Thread the yarn in through one hole and out through the other, then add the next triangle. Alternate the colors as you go.
- Leave about a foot of yarn free at each end for tying up the banner.
Hang the Kuumba banner on December 31, the day of Kuumba. Teachers can give each child one triangle and end up with a banner long enough to stretch across the classroom.
One Kwanzaa Craft for Each Day
If you'd like a plan, match one craft to each of the seven principles. Make the paper chain before December 26, then use this table for the rest of the week.
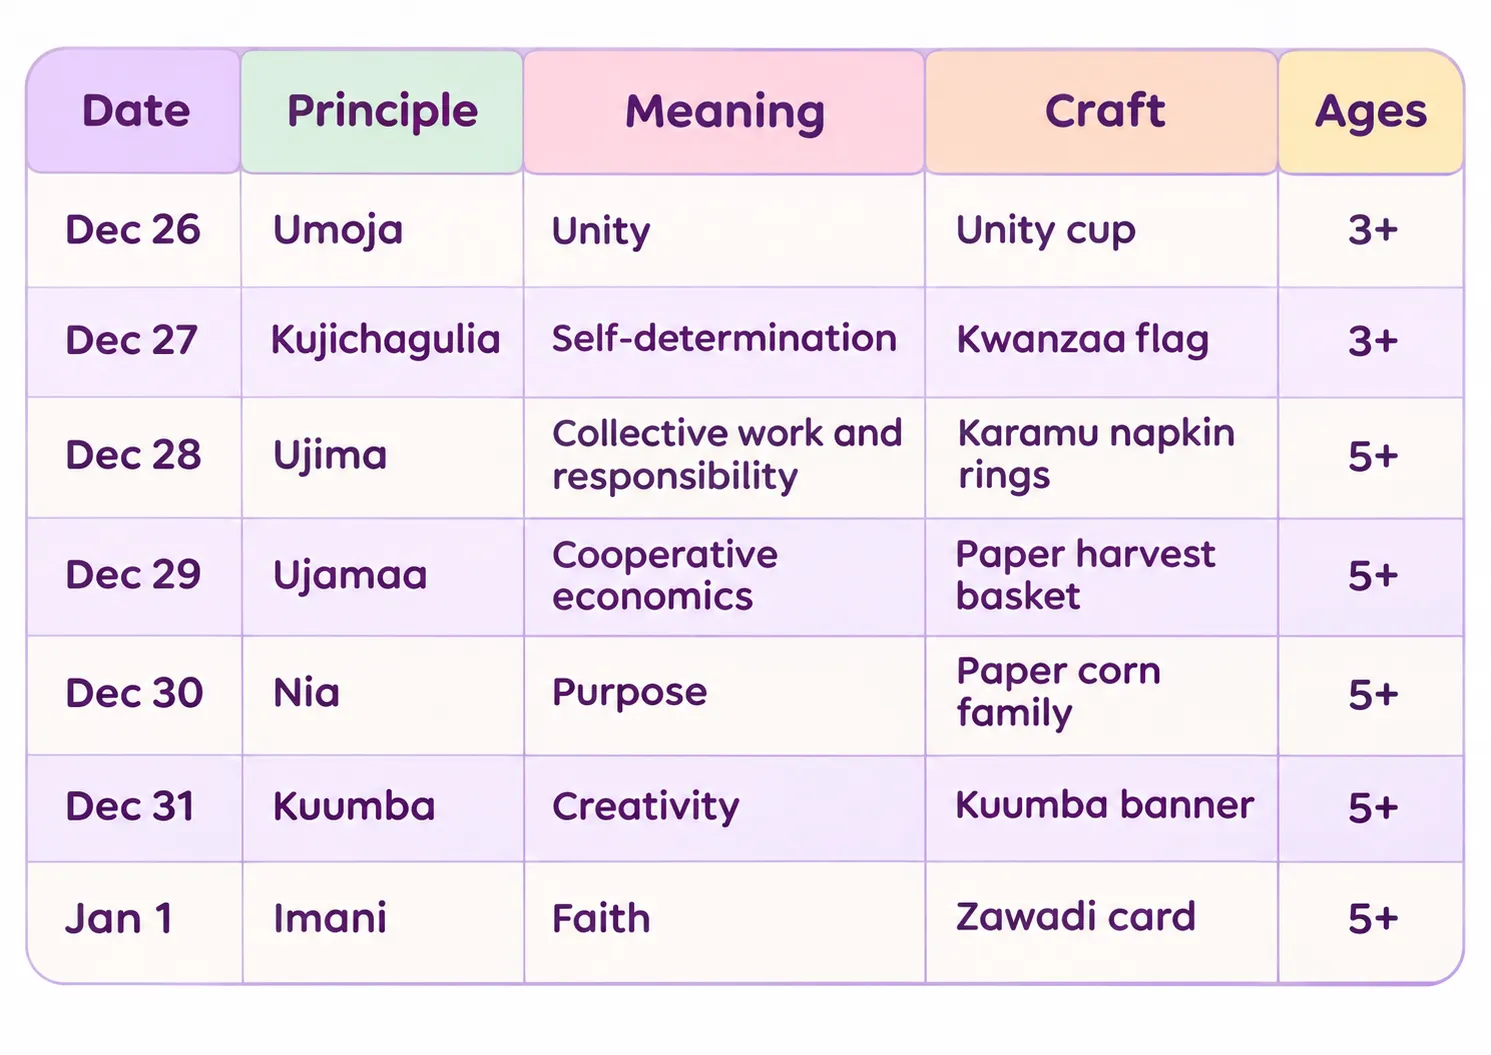
Toddlers can join in on any day with the fingerprint kinara or the corn print. Swap crafts around if your child wants to repeat a favorite.
Tips for Kwanzaa Crafts for Preschool and Home
A few habits keep Kwanzaa crafting safe and calm, whether you're at the kitchen table or in a classroom.
- Keep real candles away from paper and tissue paper crafts. Use battery tea lights next to any homemade kinara.
- For kids under 3, skip dried pasta, beads, and loose corn kernels. Stay close during every craft.
- Cover the table with newspaper or a cheap plastic tablecloth, and put kids in an old T-shirt.
- Stop when your child loses interest, even if the craft isn't finished. You can come back to it tomorrow.
- Let your child decide how it looks. A lopsided kinara your child made is worth more than a neat one you fixed.
- Use the real Swahili names, like kinara, mkeka, and zawadi, from the start. Kids pick them up fast.
- If Kwanzaa isn't your family's holiday, learn alongside your child with picture books by Black authors or an event at your local library or museum.
If your kid cares more about the painting and gluing than the finished piece, these creative art games for kids give them more chances to make things just for fun.